Share
A teak garden bench offers the perfect finishing touch to a garden or allotment. Whatever the size or design of the area, the bench has to be properly made, usually with traditional mortise and tenon joints that slot together allowing strong wooden dowels to be inserted.
Teak is considered by many as the best material for bench production as it is indigenous of the Far Eastern rain forests. Because of this, it is more than ideal for the differing temperatures we endure here in the UK.
Decide on the location BEFORE unpacking
This seems an obvious suggestion but there is no point building your garden bench in the front garden and then having to manoeuvre it round the back risking scratching it on the side wall of your house.
Under a tree or on grass should not make any difference to the life span of the bench. Remember that a good quality garden bench should last in excess of 15-20 years.
If going on a patio make sure the patio it level so you are not constantly putting a beer mat under one end of the bench.
Decking is the best location of a bench as wood tends to be level and even.
Unpacking and preparing the bench for erection
For this article we have chosen to erect our Windsor garden bench that comes in three different sizes, 120, 150 and 180 cm. We have chosen this classic looking bench as it is one of our most popular benches and oozes that quintessential English garden feel.
In order to be ready to assemble your garden bench we would suggest the following tools are needed:-
- Hammer / Mallet
- Scissors / Knife
- Screwdriver / Drill
- Sandpaper
- Cloth
Building the Garden Bench
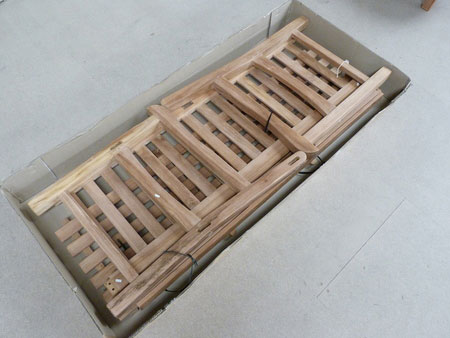
Once you have chosen the location for the bench and you have assembled the tools required, go about carefully cutting the yellow strapping on the box and then open the box by cutting the tape around the edges. The top inserted box part can be pulled away from the bottom, leaving the bench within the bottom par.
Once the box is opened, you’ll find the bench will be exposed and strapped together. You will no doubt see some sort of desiccant that will have been used as a drying agent while the bench has been on the water from its original source.
You may also see some elements of dust (or sometimes mould) on the bench. This is not cause for alarm, simply use the cloth (dampen if necessary) and wipe away any excess dust or mould. This will be a by-product of the wood having made a long journey from the Far East and is the material trying to protect itself from the dampness caused in shipping containers.
Beginning Construction
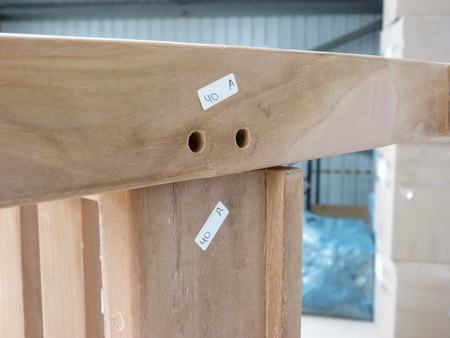
Place one arm on the floor facing you and then slot the parts into the mortise and tenon joints. These are tight for a reason so will require the use of the mallet or hammer. Make sure the joints are as tight as possible and the tenon (male) parts sits snugly into the mortise (female). Ensure that the holes then marry up and you can see all the way through. Don’t worry if they are not completely aligned as the dowels will tighten and shore up the joint once in place.
Once the superstructure is erected (on its side) you can then check the build to see if you need to use the mallet to tap the last mortise and tenon joints tightly into place. At this point MAKE SURE that you have not forgotten to put the seat base in its place before you begin the doweling procedure.
Once you are happy with the bench in terms of the joints being tight, you can begin to insert the wooden dowels starting from the bottom up. Once you have inserted the dowels at the front and back of the bottom arm, turn the bench on its side and tap any joints back into place from the top part before you finalise the joints.
- How long should it take to assemble my garden bench?It should take no longer than 15 minutes from the moment you unwrap your bench to sitting enjoying a nice glass of wine on it
- What are dowels?Dowels are used in traditional furniture manufacture and are small (usually cylindrical) pieces of wood that slot into mortise and tenon joints.
- Why should I not oil / treat my bench straight away?There are many schools of thought here but we firmly believe in leaving the bench as it is to mature gracefully over the next 15-20 years. Teak will go a silvery-grey exterior colour. Mango wood or eucalyptus wood tend to fade in the direct sunlight.
- The bench is going in a park or open space, how do I stop it being stolen?There are several anti-theft devices (anchoring kits) available to buy. We’ve also put together a handy ‘how to’ guide on this topic, too.
- Can I disassemble the bench if I move house etc?Yes you can. Benches assembled with Allen keys require you to simply re-trace your steps in terms of how you assembled the bench. With dowels and mortise and tenon joints, you will need to drill out the dowels and disassemble the bench.
You will then need to give your bench supplier a call asking them to pop a new set of dowels in the post for you. Neither method (if done correctly) affects the structural integrity of the bench.
Anna is the marketing and office manager for Garden Benches – a premium supplier of high-quality wooden benches and other outdoor furniture.