Share
It’s Christmas at Garden Benches! And that means festive garden tips, natural decoration inspiration, and incredible D.I.Y projects. And that’s what we’ll explore today with some dried fruit Christmas decorations!
A varied range of Christmas decorations is available on the market these days. From small, rustic baubles to large, bold ornaments, we’re spoiled for choice regarding Christmas decorations. However, why not scale back this year with a more traditional D.I.Y approach? Like dried fruit Christmas decorations! Dried fruit makes a beautiful addition to any Christmas décor theme, adding a lovely scent reminiscent of your favourite Christmas-themed candles. So, why not try making your own dried fruit Christmas decorations this year? To help you get inspired, we’ve got five fun and easy projects to make your own dried fruit Christmas decorations, plus how to dry fruit for decoration to ensure your dried fruit Christmas decorations last all season long.
How To Dry Fruit For Decoration

Before we look at some beautiful, dried fruit Christmas decorations for you to try, you need to know how to dry fruit for decoration. Fortunately, drying fruit is a simple process, and there aren’t many fruits you can’t dry this way. So, whether you’re drying citrus fruits for your festive décor or putting a tropical twist on your theme this year, you should be able to dry your fruit using our method. Here’s how to dry fruit for decoration in a few easy steps:
- First, chop your fruit into small slices. You want them to be between ½ – 1 cm thick so they will dry quickly.
- Next, place your fruit on a lined baking tray. Then, put them into a preheated oven at 100°.
- After about 2 hours, turn your fruit. Then, leave them for another 2 hours. These times may vary depending on the size and type of fruit you’re using. So, ensure that you check your fruit regularly as it dries.
- Then, remove your fruit slices from the oven. If they are still highly flexible, you should return your fruit slices to the oven for another hour or two until they have hardened. However, if they are dried out, you can remove your fruit slices from the oven and allow them to cool before using.
5 Incredible Dried Fruit Christmas Decorations
So, now you know how to dry fruit for decoration, it’s time to put your newfound knowledge to good use! Here are five fun dried fruit Christmas decorations you can make for a fun twist on your festive décor this year.
Traditional Dried Fruit Christmas Decorations
You can make traditional dried fruit Christmas decorations in almost no time. This simple craft consists of drying your fruit as per our guide above, then threading them together with a couple of extras. Here’s how to make traditional dried fruit Christmas decorations:
You Will Need:
- Dried fruit (oranges and lemons work well)
- Cinnamon sticks
- String
- Needle
How To:
- First, tie a knot in your string. As this knot will have to secure the fruit once you have threaded it onto the string, you may want to make more than one knot to ensure it will hold.
- Then, thread your dried fruit and cinnamon sticks on your twine vertically, so they make small stacks. Don’t be afraid to play around with your design here! Alternate between your dried fruit and cinnamon sticks for some fun finishes.
Dried Fruit Arrangements
Dried fruit arrangements are a step up from traditional dried fruit Christmas decorations. To make a jaw-dropping dried fruit display, you’ll need a couple of different types of fruit for drying and a few fun extras. Of course, you can make almost any decoration using other dried fruit arrangements. For example, the more crafty of you may find joy in turning your dried fruit arrangements into place cards for the table or unique present toppers for your loved ones. However, here’s a simple project for an excellent dried fruit garland.
You Will Need:
- Dried fruit (oranges and lemons work well)
- String
- Needle
How To:
- Start by threading your first piece of fruit onto your garland. You should thread the piece of fruit from the back, so the front is unblemished and will hide the string when complete. Thread the string through the fruit at the 1 o’clock point, leaving a tail of thread on the other side of about 12 inches. Then, thread the string back through the front of the fruit at the 11 o’clock point.
- Now, take your next piece of fruit. Like before, start threading your string through at the 1 o’clock point. Pull it all the way through so it is taut against the last piece of fruit. Again, pull the string back through at the 11 o’clock point. Continue adding fruit to your garland in this way until you are happy with its appearance.
- Finally, once you have all your fruit on the garland, leave another tail of around 12 inches. Before joining the two 12-inch tails, check that your fruit hasn’t bunched up together; shuffle the pieces along the twine if they’ve huddled together. Then, take the leftover string, use it to make a loop, and knot it a couple of inches down. If you have any excess string, cut it off.
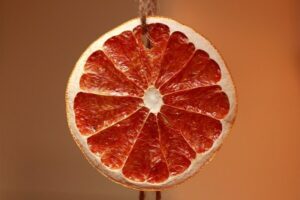
Dried Citrus Fruit Ornaments

Although you can make the other decorations we’ve had a look at so far with almost any fruit you’d like, you’ll need citrus fruits for this one. However, there’s still plenty of variety with citrus fruits. Try making these dried fruit Christmas decorations with oranges, lemons, limes, grapefruits, kumquats – see, there are plenty of citrus fruits! Plus, you’ll need cookie cutters for these dried fruit Christmas decorations, so make sure to choose some unique shapes.
You Will Need:
- Citrus fruits of your choice
- Cookie cutters of your choice
- Needle
- String
How To:
- First, you must cut the shapes of your dried fruit Christmas decorations before drying them. So, peel your citrus fruits and remove as much of the pith as you can.
- Then, you can use your cookie cutters to cut the whole citrus fruits into shapes.
- Once you have cut all your fruits, dry them using the instructions above.
- Finally, once your citrus fruit ornaments are completely dried, use a needle to poke a hole through the top and thread your string through for hanging.
Citrus Peel Roses
For some unique dried fruit Christmas decorations, you can make use of the peel of citrus fruits. Of course, if you make the dried citrus fruit ornaments above, this is a perfect way to use up the peel. However, if you’re cooking with or eating citrus fruits, this is a great way to recycle the peel. For perfect decorations, though, you’ll have to peel the fruits the right way!
You Will Need:
- Citrus fruits of your choice
- Peeler
- Toothpicks
How To:
- First, peel your fruits. For successful roses, you’ll need to peel them in such a way that you will finish with one long stripe of peel of even width. To do so, you should use your peeler to start peeling from the top of the fruit and cut downwards in a spiral movement. Try not to get too much pith in your peel.
- Next, start making the rose shape. Wrap the peel around itself until it takes the shape of a rose. Then, fix the ends together with a toothpick to stop the decoration from unravelling.
- Finally, dry the peel. It’s best to dry these decorations over a hot radiator, as it will be quicker and safer than using an oven. However, you can use these ornaments as they are if you’d like.
Create Cranberry String Garlands

Dried cranberries make fantastic Christmas decorations. And this simple D.I.Y project will make the best use of these fruits. With a bit of time and plenty of dried fruit extras, you can create beautiful wreaths from simple cranberries. When threaded into little garlands, you can transform these festive favourites into beautiful, dried fruit Christmas decorations.
You Will Need:
- Fresh cranberries
- Boiling water
- Baking tray
- Large needle
- Waxed thread
- (Optional) Extra decorations, such as slices of dried fruit, pine cones, nuts or cinnamon sticks
How To:
- First, start the drying process. You can dry your fresh cranberries by placing them in a bowl and covering them with boiling water. Once they have popped, drain and dry them, and place them in a single layer on a baking tray. Then, put them in the freezer for 1 – 2 hours.
- Before you take your cranberries out of the freezer, preheat the oven to 170° for about ten minutes. Then, turn the oven off and place the cranberries inside. You can leave them overnight until they have dried out.
- Finally, start making your garlands. Use the large needle to thread the cranberries onto the waxed thread. If you’d like to use extra decorations, you can thread these onto the garlands in between the cranberries for unique dried fruit Christmas decorations.
Making Your Own Dried Fruit Christmas Decorations
Making your own dried fruit Christmas decorations couldn’t be simpler and is a fun, festive activity for all the family. So, get stuck in! Give some of our D.I.Y dried fruit Christmas decorations a try. Of course, you can add anything you’d like to these projects – throw some glitter in there for a bit of sparkle, dip your dried fruit in fragrance for a lovely festive scent or paint them with unique patterns. Make these dried fruit Christmas decorations your own, and add some rustic festive cheer to your decor this year.
Do you have any suggestions for more dried fruit Christmas decorations to make? Let us know your ideas!
Sources
https://www.masterclass.com/articles/how-to-dry-fruit